
.png)

 100% Recycled Plastic
 Will Never Rot
 25 Year Guarantee
 Low Carbon Footprint
How to install Recycled Plastic Decking
SITE PREPARATION.
The chosen site should be free from obstacles and free draining.
It is good practice to have a small gradient to allow water run off.
If the decking is to be installed over soil it is preferable to install a weed barrier or membrane to prevent any vegetation growing through your deck.
SUB FRAME CONSTRUCTION.
There are two types of sub frame construction. Which you use depends on your ground conditions and preferred deck design.
1. RAFT CONSTRUCTION (FIG 1).
A raft type construction sits directly on the ground and requires that the beams and joists are joined together using 90° angle brackets or joist hangers.
It can be useful to install a layer of pea shingle under this type of construction to aid with levelling.
When used with a 50 x 125mm beam and a 38mm decking board, this will give you a finished height of 163mm above ground level.
It is recommended that you allow a slight gradient fall in the direction of the decking grooves in order to allow free drainage of the deck surface.
The raft method should only really be employed where the final height of your deck is an issue.
The main beams should be laid out with up to 600mm centres – the actual centres will vary according to your overall deck size – and joists should be attached at 90° using angle brackets or joist hangers, to a maximum of 1.5m centres (See Fig 1).
Should balustrading be required, the posts should be concreted into the ground to a minimum depth of 500mm around the outside of your deck area at a maximum of 1.5m centres and a further beam screwed to the outside edge of the posts to allow the decking to be attached.
Accessories can be found here on our website.

Fig 1
Where balustrades are not required at least two short posts should be concreted to the ground at diagonally opposite corners of the structure in order to pin the whole sub frame to the ground.
Where two deck planks need to be abutted (leave a 5mm gap for expansion) it is recommended that the beams be doubled up as shown in Fig 2.
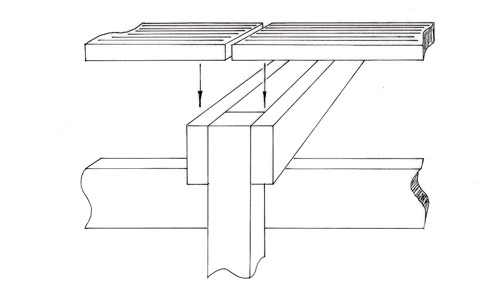
Fig 2
Once the main sub frame has been completed the decking boards can be screwed in place using either stainless steel or 1000 hour sea spray protected decking screws.
It is recommended with recycled plastic that oversize holes are used in order to allow expansion and contraction of the boards, and that all holes should be pre-drilled prior to screwing.
2. ELEVATED DECK CONSTRUCTION (FIGS 2 & 3).
This is basically a post and beam construction method and is used where the deck is to be raised above ground level or is on a sloping site.
It is recommended that you allow a slight gradient fall in the direction of the decking grooves in order to allow free drainage of the deck surface.
Posts should be concreted into the ground to a minimum depth of 500mm, allowing a maximum distance of 600mm between beams and 1.5m between joists (Fig 3).
The joists can then be bolted to the posts using either stainless steel or sea spray resistant coach bolts, washers and nuts. The beams can then be attached at 90° above the joists (Fig 3).
It is recommended that beams be attached on both sides of the posts where it is likely that two decking boards will be abutted end to end (Fig 2).
If the deck is to be raised above 750mm from the ground some additional cross- bracing may be required.

Fig 3
Where balustrades are to be added the outside posts should be extended to a minimum height of 1120mm above the deck surface and to a maximum of 1500mm between posts – although this distance will be dictated by the overall size of your deck.
Once the main sub frame has been constructed the decking boards can be attached in the same manner as for the raft construction, making sure to allow oversize holes for expansion and contraction.
FITTING BEAMS AND JOISTS
With raft construction the beams and joists would be joined together using joist hangers or angle brackets. These should be fixed using single thread screws.
The simplest and strongest way to affix beams and joists is to place the beams on top of the joists and to bolt both to posts as shown in Fig 3. They should be attached using coach bolts and washers, preferably made from stainless steel or 1000 hour sea spray treated.
If balustrades are required it is important to that they are incorporated into the sub frame of the decking so that the decking can be fitted around the uprights.
FITTING THE DECKING BOARDS
The decking boards can be screwed to the beams using single thread stainless steel or 1000 hour sea spray treated decking screws, using a slightly oversize hole to allow the boards some movement for expansion and contraction.
Where boards need to be abutted it is a good idea to leave a gap of about 5mm to allow for expansion, particularly when constructing in cooler conditions.
If balustrades are fitted the decking should be cut around the uprights.
To provide a neat finish a kick board can be attached to the outside of the uprights, to which the decking boards can be abutted.
FITTING BALUSTRADES
As mentioned earlier, the uprights for the balustrades should be incorporated into the sub frame and a kick board attached around the outside of the uprights. The rest of the balustrade can be constructed after the decking boards have been attached.
RANCH STYLE BALUSTRADE
These are essentially just uprights with a kick board at the base, a central horizontal rail, a top rail and a handrail. The kick board, centre rail and top rail should be screwed to the outside of the uprights using the same type of screws used for the decking boards. The handrail should then be screwed down to the top of the uprights and top rail as shown in Fig 4.
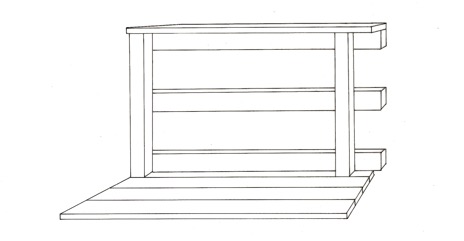
Fig 4
TRADITIONAL BALUSTRADE
A balustrade can also be constructed using a series of 50mm x 50mm upright spindles. This can be constructed in the same way as the ranch style, but instead of fixing a centre rail, fix the upright spindles at approximately 150mm centres (leaving a gap of approximately 100mm between spindles). See Fig 5.
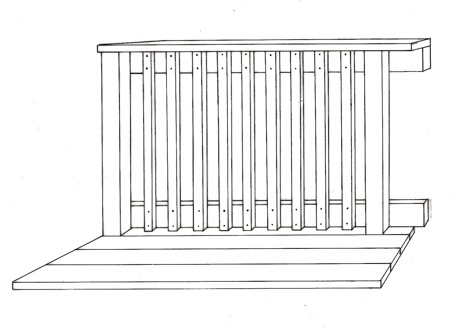
Fig 5
GENERAL INFORMATION FOR WORKING WITH RECYCLED PLASTIC
DRILLING
All fixing holes should be pre-drilled with an HSS or wood bit prior to screwing. A low drilling speed is recommended.
SAWING
Recycled plastic can be sawn using a handsaw, circular saw or chop saw (including cross- cut mitre saws).
A slow cutting speed with a medium tooth blade is best, for example a 305mm 60 tooth TCT blade.
If a slow cutting speed can not be achieved it will be necessary to reduce the number of teeth on the blade, for example a 305mm 40 tooth TCT blade.
In all cases when working with recycled plastic it is recommended to keep operating speeds low in order to prevent material from melting on the surface of your implement
SPECIFICATION
|
Description | Kedel recycled mixed plastic decking is made of 100% high quality waste from post industrial and consumer use and where necessary selected process additives. |
|
Composition | LDPE (Low Density Polyethylene) HDPE (High Density Polyethylene), PP (Polypropylene), ABS (Acrylonitrile Butadiene Styrene Co-polymer), HIPS (High Impact Polystyrene) and other thermoplastic materials. |
|
Production Process | The polymers are ground, mixed and fused under high temperatures and pressures into pressed moulds. |
| Finish | The surface is knot free, evenly coloured and shows a textured structure. |
|
Properties |
|
SPAN LENGTHS - RECOMMENDED FOR RECYCLED MIXED PLASTIC DECKING
| Size (mm) | Max. Centre to Centre Distance (mm) | Max Free Span Length (mm) | Max Overhang (mm) |
| 150 X 38 | 600 | 550 | 125 |
| 150 x 27 | 500 | 450 | 125 |
| 195 X 28 | 400 | 300 | 20 |
| 197 X 60 | 700 | 640 | 80 |
| 170 X 40 | 640 | 600 | 70 |
| 165 X 48 | 520 | 440 | 60 |
SPAN LENGTHS - RECOMMENDED FOR RECYCLED PLASTIC WOOD DECKING
| Size (mm) | Max. Centre to Centre Distance (mm) | Max Free Span Length (mm) | Max Overhang (mm) |
| 120 X 20 | 600 | 550 | 125 |
These free spans of lengths of support have been calculated according to the following load conditions:
-
A distributed load of 2.5kN/m2
-
A point load of 1000N applied to the middle of the profile
-
A long term load applied by the mass of the decking profile
The maximum required deflection is determined at 1/250 of the free span length for calculating the maximum centre to centre distance and for the maximum free span length and at 1/600 for the maximum overhang length. We always consider and take into account a dynamic safety factor of 2.5 for permissible stresses in short term conditions. For longer term loading we must take into consideration creep of the material. For different loading conditions, Kedel can calculate the maximum permissible free span from first principles.
CONSTRUCTION
Kedel decking can be constructed using countersunk chipboard screws with a 6mm diameter (80mm length) for the 38mm decking profiles and 6mm diameter (90mm length) for the 50mm decking profile. All holes will need to be pre- drilled. We recommend the use of an oversized hole to allow for movement associated with the thermal coefficient of expansion properties of the material.
LIMITATIONS
Kedel's Mixed Plastic material is less rigid (modulus of elasticity) and greater thermal elongation than timber. This should therefore be taken into consideration at the design stage of the project.